Sunday, September 28, 2014

Color Challenge

I made this sweet little card for the latest challenge over at Creative Colors Challenge Blog.

IMG_0767

Here are the details for the challenge -

Pick any three colors and use polka dots

I used dark blue, light blue and black.

The little girl stamp is from Penny Black and is colored with Copics. For the polka dots I stamped a polka dot stamp over light blue paper and embossed with white embossing powder. The pattern paper is from My Minds Eye. The background was made by using a Tim Holts Stencil and versamark ink. Its embossed with a darker blue embossing powder. I also embossed the sentiment with black powder. For the balls on her hat I used Liquid Applique, which is so cool!! Just apply it where you want it and heat it. It creates this puffy texture which works so well with this winter image!


Thanks for looking!

Thursday, September 18, 2014

More Christmas and a Chill Out Card for a Moody Teenager

My daughter is only 13 and has already mastered teenage angst…really, really mastered it. This morning was a perfect display of her talents so I figured she could use this card along with the Hershey’s bar I plan to attach!

IMG_0681

I am also linking this to My Favorite Things Sketch Challenge Blog. Link!!

Pattern papers are by Authentique. Dies and stamps are by MFT. The Dip Me is Chocolate stamp has been paper pieced. Letter stamps are by Lawn Fawn. Ribbon and flower are from Really Reasonable Ribbon.

The Sketch -


I also made another Christmas Card Yesterday. This one was fun because it broke me out of my comfort zone a little. No Copic coloring on this puppy!!

IMG_0679

I just got the Tim Holts Holiday Knit stencil and used it to make this background with Versamark and Zing’s Brown Sugar Embossing powder. The sentiment is from Simon Says Stamp and I also stamped it with Versamark and used gold powder and stamped it once then stamped it again and used Rouge. I cut out the words from the Rouge and simply mounted them above the gold. The twine is doodlebug and the snowflake charm is from my stash.

This card is being linked to Merry Monday Christmas Challenge Blog.


Thanks for looking!

Tuesday, September 16, 2014

Mojo Monday–Happy Holidays

Mondays sometimes feel like my Fridays. We are so busy with the kids and their friends and soccer and football, it just never seem I have time for my much loved hobby. I always enjoy the peace and quite of Monday and the time it allows me to play!!

I have been working on Christmas cards here and there and am making some progress. I even have a list of addresses so they can actually be mailed this year! I found a great sketch challenge and thought I would give it a try.

                  IMG_0670

I used an image I bought off of Etsy and colored it with copics. I used Distress ink in Chipped Sapphire to color the card base and the ‘happy’ which is a Simon Says Stamp die. I embossed the die cut with WOW embossing glitter. For the polka dot I stamped a background stamp from Inkadinkado with Versamark and dusted it with Forever Blue Perfect Pearls which gives it a slight shimmer. I embossed the die cut circle from My Favorite Things with silver embossing powder. The snowflake stamp and the ‘holidays’ stamp is from Technique Tuesday.Some of the ribbon is from Really Reasonable Ribbon and from my stash as is the silver snowflake charm. I also outlined the card with a white Uniball jell pen.


                                                           IMG_0675


Here is the sketch :


                            Mojo Monday

Sunday, September 14, 2014

Color! Color! Color!

I LOVE contrast. Rather it be in color or shape, I always seem to like the look of things that ….well, contrast. I like the looks of colors that are on the opposite end of the color wheel from each other. For example, for this time of the year, orange with purple and/or green. I also like to contrast shapes. Bold edges with curvy ones. Difference appeals to me. This first card is a prime example. The chevron pattern with the circle background and the orange with the apple green…I just love contrast. I made the next 2 cards for the challenge over at Creative Colors.

I just discovered this blog and really like the idea of adding a color challenge to my list of regular sketch challenge I take on weekly.

They are looking for cards using the colors orange, yellow and white AND use twine.This first card I made for the challenge has a lot of orange and white and I added twine but I was not sure if I added enough yellow when I colored my little guy. He was a challenge himself because I wanted to use my copics to blend these two colors. I was actually pretty pleased with how he turned out! I added the green for the contrast! Had to have it!!!

                                    IMG_0664

I used Liquid Pearls on the hearts and Glossy Accents on the ‘love’, which is a Simon Says Stamp die, and eyes of the little monster, which I downloaded from an Etsy site. The circle he is on is a stitched circle from My Favorite Things. Pattern paper is Echo Park and the embossing plate I used it by Life Style Crafts. The ribbon is from Really Reasonable Ribbon and the twine is from my stash. The ‘EYE’ and ‘YOU” are also stamps from Simon Says Stamps.


                                             IMG_0662

For this second card I found these sunflowers in my stash. I thought they worked perfectly with this theme. The pattern paper is old Chatterbox and the circle is cut with a MFT die and stamped with a ‘Knit’ stamp by Impression Obsession using Distress Inks. The bakers twine from Doodlebug and the regular twine is from my stash. The ribbon is from RRR. The ‘Happy’ stamp is form SSS and the ‘Thanksgiving’ is Technique Tuesday.


                                             Creative Color Challenge #18

Thanks for looking!!

Thursday, September 11, 2014

MFT Wednesday Stamp Club and an Extra!

As you may know, I am in looooooove with My Favorite Things. I hardly do a project where I do not use their products in one form or another. In today’s card, I think may be one of my most favorite cards I have made in a while!

IMG_0659

For this card I used My Favorite Things Which Way Is The Candy stamps, circle STAX die cut and Dimensional Banners. The circle is ‘the moon’ and it is colored using Distress inks in Squeezed Lemonade and Spiced Marmalade. I used Copics to color the little witch and bat. The thin frame die cut is from Simon Says Stamp and the Ribbon is from Really Reasonable Ribbon. The ribbon color did not show up too well in the photo. It has a slight shine to it. IRL it is about the same as the green Copic coloring on the witch’s shirt and leggings. The small clouds are cut from vellum. I hid the adhesive under the bat and the witch.


I am linking this to the MFT Wednesday Sketch Challenge site!

MFT Wednesday Sketch Challenge Blog


I also had some time to finish another card today….

IMG_0648

I wanted to do something different for my daughter’s Christmas card so I went with green, even to I always seem to gravitate to red.

The stamp is from an Etsy Store and is colored with Copics. The ribbon is from Really Reasonable ribbon and the sequence is doodlebug filled with Liquid Pearls. For the background I smeared on Pumice Stone Distress Ink and brushed on wet Perfect Pearls. Its really hard to tell from the picture but it is a beautiful shine. I mounted it on gray Bazzil cardstock. I also added Martha Stewart glitter to her belt and polka dots with my Signo gel pen.


Thanks for looking!

Wednesday, September 10, 2014

More Back to School

I have five kidos so I have been busy making lots of back to school cards! There school colors are Red and white so this challenge from The Card Concept is perfect for me!

Here is my card for this challenge….

IMG_0641

Here is the challenge -


I would say my style is Clean and Layered -

Definition:

  • clean lines
  • lots of layers
  • designer papers/embossing
  • embellishments/accents
  • clean and fresh looking
  • some coloured images at times
  • white space

Thanks for looking!

Monday, September 8, 2014

Challenges!

Now that school is back in session I have had a lot of time in my craft closet. Yes. I craft in a closet… a very cool closet. Its filled with reclaimed items put to good use as storage for all my supplies. I can honestly say I have not spent more then $15 on any one storage item. I hit thrift stores, auctions and even the occasional dumpster to find good, creative, inexpensive item to help corral my beloved craft supplies. Maybe I will post my closet….let me know if anyone is interested!

All that time in my closet has helped me complete two challenges this weekend. The first one is from the Tiddly Inks Challenge Blog.

                                                      DSCN1094

Tiddly Inks Challenge Blog

Here and the colors for the challenge -


This first one was so much fun to make! The original digital stamp had a background. I first colored this sweet little bunny and then totally messed up on the background. So. since I spent so much time coloring him, I cut him out and made a new background. I love the background Sandy Allnock made in this video but I did not have all the copics to make it the way she did….but I DID have Distress Inks which I thought would work. I simply wiped the cardstock with the inkpads –Bundled Sage for the ocean and Tumbled Glass for the sky and drew waves with my multi liner. To get the look on sunlight streaming threw the water I out white pigment ink on a sponge and wiped it down the – ink. The bunny is colored with my copics. The the die cut sun, seaweed and the little fish are stamps by Simon Says Stamps. The sentiment is from My Favorite Things and the twine is from Doodlebug. I used Glossy Accents on the diving mask. BTW- I made this card for my oldest daughter who wants to me a marine biologist. She got diving equipment for her birthday and has been using it all summer in the river by our house.

I also finished a card for the CAS(E) sketch! Here is the sketch – Link


                    CAS(E) this Sketch Challenge


And here is my card -

                                                    DSCN1088

The stamp is by Outlines and the stripe pattern paper is by Lawn Fawn. The this border is cut using a die cut by Simon Says Stamp and the pearls are from my stash. The twine is from Doodlebug. Sentiment is from The Stamps of Life


That’s it for now! Shoot me a comment if anyone is interested is seeing a post about my eclectic craft closet!

Friday, September 5, 2014

Happy to be a Bit Early!

Here you have it….My second Christmas card so far! And its only the beginning of September! Feeling pretty proud of myself!

                             DSCN1087

My tendency would have been to color her little hat coat and stockings red but I opted for blue. This image is by My Favorite Things and is colored with copic markers. The yellow  pattern paper is by Fancy Pants and the wood is by Glitz, The snowflakes are made using a EK Success punch and adding Liquid Pears for the centers. The twine is by Doodlebug and the circle die cut (cut in half) is by My Favorite Things. The blue ribbon is from Really Reasonable Ribbon. I drew stitched lines with a Distress Marker across the Yellow paper to add interest.


I am linking this card to The My Favorite Things Sketch blog. Find it HERE!


And here is the sketch -


Wednesday, September 3, 2014

Digi Stamps Are Cool!!!

I am loving the fact that I new ‘stamps’ are just a click away at a fraction of the price! Here are a few cards I have made with my resent online purchases and a few tips I have discovered.

Tips :

1. Always print at least 2 of the image. Why? I do this because I like to practice a bit before actually go to color an image for a card/project. It is not hard to print out images but if you start one and mess up it is a pain to have to go back and print another. Messes with the creative mojo flow!

2. If possible, cut images into the size of your finished card. This gives you options. Do you want to use it as a card front? Or do you want to fussy cut it? This was you have options.

3. Keep printed images in a photo box or another easy-to-look-threw type of storage.

4. Save digi images in one file on your computer labeled by maker.

5. Keep images the size they are intended by the maker. It seems to me that if they are enlarged, the quality is not as crisp.


Ok, ALLL that being said, I am new to this type of stamps and welcome any other advice a more seasoned digi stamper has to offer. These are just things I have found to be helpful.


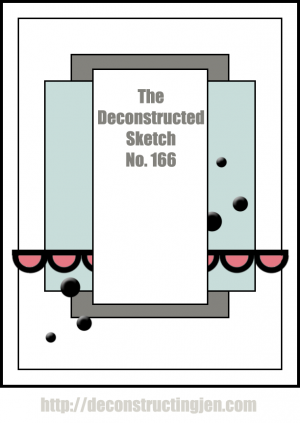
This first card was made with a digital image from an Etsy store called All Dressed Up Stamps. The design of this card is a bit different for me but it still has Copic colored Images, which I love! It is based on a sketch from CASE this sketch. I will be linking it up!     


                                                              DSCN1077

The Sketch


I printed the image on Express It cardstock for Copics. The sentiment is by Avery Elle and the sequence is by Doodlebug. I covered the holes in the sequence with Liquid Pearls. The small pearls are from my old stash. For the lines on the lower left, I first drew lines in pencil to be sure I was going to like this detail. I then traced the lines with my Copic Mulitliner two or three times skipping part of the lines randomly. I also covered the heart on her dress with Glossy Accents.


                                                                  DSCN1075


This is a Tiddly Inks image colored with Copics. The sentimet is stamped with Lawn Fawn Milo’s Alphabet. I used a Sizzix Texture Plate and dies from Simon Says Stamp. The ribbon and the pearls are from my old stash!

Be sure to give Digi stamps a try! If I can figure it out, anyone can!

Tuesday, September 2, 2014

My Favorite Things ‘Get Sketchy’!

ETA - I must have missed the link up by just a few minutes!! What a bummer.....


For some odd reason I am actually ahead on making seasonal cards. I have given all five of my kidos their back to school cards. I even have a few Halloween cards made – in part, I believe, because of the awesome new My Favorite Things release of so many adorable Halloween stamps and dies.
And today, I can hardly believe it, I made a Christmas card! Really, I did! Hopefully, Ill even get a head start on my Christmas shopping! …probably not!

                                                     IMG_0579
The pattern paper is by Studio Calico. I die cut the stars from the MFT Die-Namics Star STAX and I uses one of the circle die STAX to cut our the circle. I uses ribbon from Really Reasonable Ribbon under the banner which is also cut from a MFT die. The sentiment is from the Delicious Birthday stamp set by MFT. The ribbon I used to ‘attach’ the stars is from Doodlebug and the rhinestones are a Dollar Store find!

I did not have cardstock to match the ribbon so to make the base of the card I simply colored a line around the edge with a Copic Marker and mounted the white dry embossed paper ( with an embossing folder by Sizzix) on top. For the banner I sponged ‘Peacock Frathers’ Distress Ink onto cardstock and then stamped the sentiment with Versamark and covered it with white Hero Arts Embossing powder, then heated it.

To make the stars I first die cut them from cardstock then I pushed them into my Versamark Ink pad making sure they were totally covered. I then sprinkled silver embossing powder over them and heat them with my heat gun. When they were still hot I again sprinkled more silver embossing powder over them. This creates a thick, solid looking surface and great shine!
                                                                            IMG_0581
I made this card based off of the sketch over at the Wednesday Stamp Blog for MFT.
                                                            

Monday, September 1, 2014

Tiddly Inks and A Card for a Teacher

My newest discovery in my crafting life is digital images. I always thought I was not computer savvy enough to handle the process of downloading, extracting and printing images form the internet so I never even tried.

This weekend I was checking out the adorable images on the Tiddly Inks website and thought I might try to download a few of the free images. With no issue at all, I was able to get them on my computer and even printed them out! It was so much easer then I thought! So, I bought a few images to make back to school cards for some of my kid’s favorite teachers. These images were so fun to color!


                                                   DSCN1068

For this card I used the ‘envelope’ background stamp by Hero Arts and Simon Says Stamp Frames Craft Dies to frame the image. Speaking of the image, it’s the ‘Teacher’ stamp by Tiddly Inks and is colored with Copics. I created the title by using three different stamp sets – ‘have a’ is by Technique Tuesday, ‘Happy’ is by SSS and ‘School Year!’ was made using Lawn Fawn Mylo’s Alphabet Set. I added the ribbon to the card and cut small slits by the books so I could thread the ribbon threw them and the books could still be visible.


I am linking this card to the Tiddly Inks Challenge Blog and  Shopping Our Stash ABC Challenge A-Apple B-Books C-Copics


                                                    DSCN1069


The adorable little dragon on this card is another image by Tiddly Inks colored with Copic Markers. The pumpkin stamp and the different die cut matts are by My Favorite things and the sequence is from Doodlebug. I covered the holes in the sequence with Liquid Pearls… I think they look more finished with something covering the holes. And adds a little more dimension. The ribbon is actually scraps I had in my stash. The pattern paper is (again! lol) very old and I am not sure who it is by.

I ma linking this card to The Deconstructed Sketch.


Related Posts Plugin for WordPress, Blogger...